Green Living Organics (.org)

Sustainability through healthy living

   Aug 28

Chicken Adobo

I love this dish. It’s one of those “put it all on the pot and let it cook until you’re ready to eat” kind of dishes. We like it served over brown rice and with some avocado on the side. Of course, I like avocado on the side of everything. We first learned about this dish from Nathan’s aunt Cindy. We stopped by there house on our way out west and she fed us this delicious dish that was simmering on the stove. We asked and she said it was very simple and is a traditional Filipino dish. We found a recipe on Big Oven and made a few alterations until it was just like we liked it. This recipe is for 2 people, but it’s easy to add more chicken, just chop it up smaller so it all fits.
Ingredients:

2 whole chicken legs with thighs
You can also do a bunch of legs with no thighs or get a whole chicken and chop it up, but the dark meat is the best part for this dish. Do not try it with boneless chicken. It needs the bones. Also, leave the skin on. It helps keep everything moist.

1 1/2 C Apple Cider Vinegar
I use the unfiltered stuff I get in bulk at the food co-op. Some recipes call for just any old vinegar. They are wrong. Apple Cider is the only way to go.

1/2 C Soy sauce
I also use the good stuff from the bulk department. You can use the packaged stuff, but I can taste a difference. Some recipes call for adding salt as well. Since soy sauce is basically liquid salt in my book, I think adding salt is plain silly.

6T Garlic; finely minced
I usually use a whole bulb and send it through the garlic press, but don’t tell Nathan b/c I think he thinks I put too much garlic in most things. He’s never complained about the chicken adobo not being awesome, though, so let’s not ruin the illusion. :) Honestly, he only complains when he SEES how much garlic I put in, otherwise we’re good to go.

1t Pepper; freshly ground
We have all of our pepper already mixed black/green/white/red, but if you aren’t all multi-colored it’s okay to be all black. Also some recipes call for 1T of peppercorns. This is a bad idea. I guess you could try to strain out the peppercorns, but that’s a real pain. Nathan & I have nixed the whole -or even cracked- peppercorns due to our mutual dislike of the almost chewy but still crunch nature of those little buggers.

2 Bay Leaves

1 12-oz can Coconut Milk
I really like this part, but it’s optional. If you leave out the coconut milk, your adobo sauce will be much thinner, but still delicious. I just love the richness that the coconut milk gives it.

Some recipes say you can add 1T of brown sugar, but I find that to be completely unnecessary.

Take all of your ingredients and mix them together in a big pot. We use a red Dutch Oven that my dad got us one year for Christmas. It’s the perfect size. You’ll want to start with all of the non-chicken stuff and really mix it up well, like with a whisk, to get the lumps out of the coconut milk before you put the chicken bits in. I mix everything in the pot we’re going to use to cook because why dirty another dish. The real trick is getting the chicken legs to fit properly because sometimes they’re bigger since we get the local free roaming chickens that aren’t all freakishly identical in size.

Now several recipes say to marinate for a few hours at this point. I never manage to plan that far ahead (except for this one time and I found the marinating didn’t really do anything to make it better), so I just go ahead and put it on the stove. You can also do it in the oven if you feel the need. Just bring the whole thing to a boil and let it go for a while until the meat has started to pull away from the bone (you can do it for less time than that if you must, but this is my recipe so I’m going to tell you how I do it). I usually do this part with the lid on, but sometimes I do it with the lid off. It all depends on my mood.

A quick note: make sure you have thawed your chicken if it’s frozen as this process will leave you cold and uncooked on the inside otherwise.

Another note: While you’re boiling the chicken, you should cook your rice so it’s ready to go when you are.

Once your chicken is cooked, pull it out of the sauce and put it into the oven on a LOW broil for about 5 minutes on each side. Don’t leave it alone because you don’t want to burn it. Reduce the sauce  (they say to half but that takes so darn long, I just reduce until the chicken is done broiling). Then serve it up (rice on the bottom, then chicken, then sauce) and enjoy.

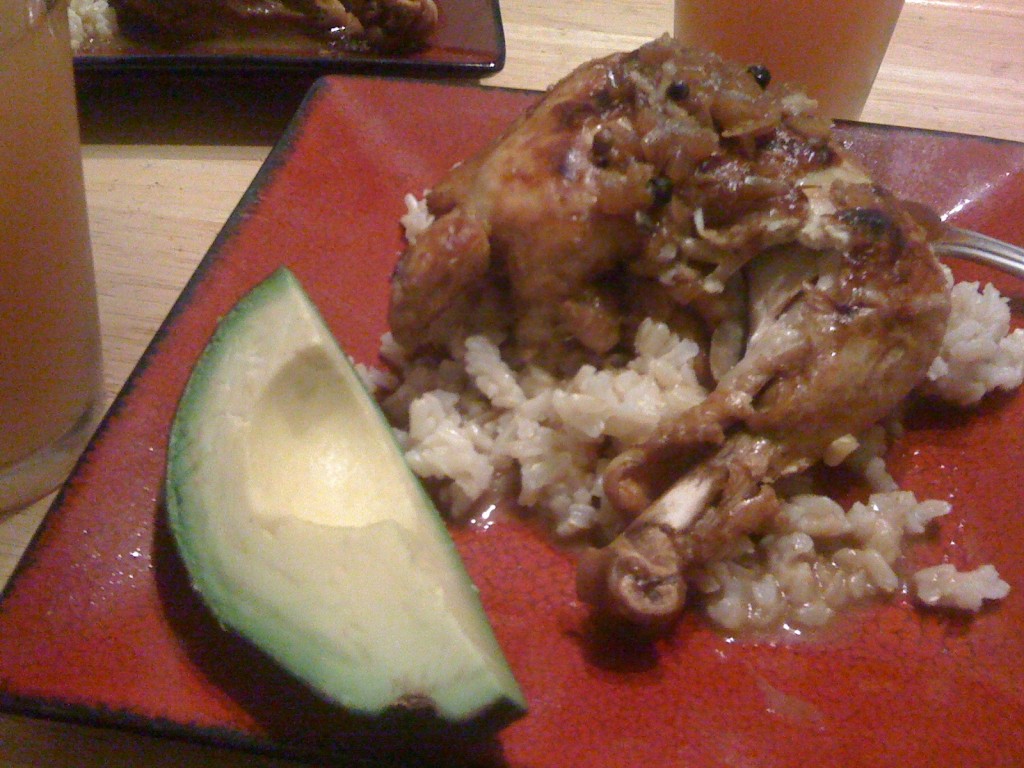
It should look like this:

Be impressed at my self-restraint. I actually took this photo before diving in. I used my phone because I knew if I had to go get the camera I would give up and just eat it. You can’t stand around smelling this stuff and take pictures. You must eat it immediately. Your brain won’t let you resist.

   Aug 19

A story about a boy with ADHD

My mom shared this story with me and I recently shared it with a family struggling to help their son with severe ADHD. I had heard stories of parents helping their children with ADHD through diet and nutrition, and I have even met several of these amazing people. One thing I have never heard is that it’s easy. With all of the junk out there, how are we supposed to get children filled with proper nutrition rather than chemical food-like substances? Is it even worth the struggle? Read this story and look at the before and after pictures.

Nicholas’s Story

Hyperactivity creates many problems for the whole family. In the story below, Susan Pizzolato tells of the journey Nick took from diagnosis, through medication, to a wellness program and health.

One day, as I sat at the table, i looked across and saw a little boy staring out the window. He was so very skinny and pale. His skin was a grayish tone. He had dark circles under his eyes. He glanced at me for a moment, and my heart broke as I realized there was no more sparkle in his eyes. Where had it gone?

This little boy is my son, Nicholas. When he was six years old, he was diagnosed with ADHD, Attention Deficit Hyperactivity Disorder. As any mother would be, I was tortured by the decision to give him medication to deal with the problem which was so new to me.

Without medication, Nicholas was very aggressive – sometimes to the point where he would get physical. He’d get so frustrated that he’d beat his head against the wall. For the most part, social interaction was impossible because he would fight with the children or be verbally overbearing. His self-esteem was rock-bottom. He walked around saying, “I’m so stupid.” “I’m so dumb.” while he would beat on his head with his fists.

We began medication a few months after he was diagnosed. First Ritalin, to which he was allergic; then Cylert for about a year, succeeded by Dexedrine. At first I thought we’d found the help we needed. However, Nick reached a point where he wouldn’t eat. The medication suppressed his appetite. About 11 p.m. he’d be ready to eat, saying he was starving.

He suffered tremendously with insomnia. He would not sleep before 3:30 a.m. Eventually I had to home-school him because there was no way I could send him to school with 3 hours sleep.

Nicholas wouldn’t go out to play. At soccer practice, he could hardly keep up. By the time he played one quarter, he’d be standing there, holding his sides, trying to breathe.

He constantly bit his fingernails or picked at things nervously. Most of all, I realized that he didn’t smile anymore. He seemed kind of sad, and when he would laugh, it would be just a slight smile.

I continued to search for a solution. We always ended back at the medicine bottle. When he was seven, a loving friend approached me with the idea that maybe trying Shaklee supplements would help. I had read articles on how important diet was and how deficient ADHD children’s bodies’ were in many nutrients. But my reply to her was that there would be no way I could get Nick to take all those supplements. That was MY opinion.

After going through another year with Nicholas on Dexedrine, I knew something else had to be done. I prayed each day that something better would come along, and so it did. My loving friend called again to say that Dr. Karen Craig had put together some information on ADHD and supplementation. I was at my lowest point. After listening to Dr. Craig’s tapes, I got all the supplements she recommended and sat down to have a talk with Nick.

We discussed all the bad things medication had done, and what we were about to embark on. Nick would be taking 10 to 12 supplements at each meal and some before bed. To offer support to Nick, the whole family went on the program with him!

The first three days were a challenge. Nick would fuss about taking the “stupid vitamins” and whine, “Do I have to?” On the third day, her really tried my patience. We had company very early in the morning. In the chaotic situation in the house, Nick became obnoxious. He got louder and louder about not taking the vitamins. It came time for “Truth or Dare!” I reached up, took a pill out of his medicine bottle and said, “If you won’t take your vitamins, then take your medicine.” He looked at me, slid the pill back across the counter and said, “I’ll take the stupid vitamins.”

From that point on, Nicholas has been a different little boy. He has abundant energy, and a new zest for life. Soccer games are a breeze now, no shortness of breath. He goes outside to play all the time, and he sleeps at night. He goes to bed and actually rests! His appetite is good. He has shiny hair and a glowing complexion. He no longer bites his finger nails, and he takes his supplements without complaining.

Best of all, Nicholas now has friends. He doesn’t feel that he has a problem in every situation. He’s a wonderful little boy with bright, shiny eyes and laughter that can fill a room. And he has a hug to share with everyone.

I don’t need to try to convince you that Shaklee has changed our lives. I’ve shared with you from my heart. Nick has been on supplements for 9 months without any medicine. I’m not going to say that it’s easy, because sometimes we get hung up on little things. The first time Shaklee was suggested, I was hung up on the number of supplements. How STUPID I was. It’s just food, you see. I forgot to ask the person it would truly benefit. I didn’t ask Nicholas what he would do about it.

Nicholas is the real hero of this story. If it hadn’t been for him saying, “I’ll do it,” our whole family would be without Shaklee food supplements. And his father, Joel, would still be having headaches. But that’s another story.

Products used (updated to current product names): 

Instant Protein

Vita Lea

B-complex

Lecithin

Zinc

Calcium Magnesium

Snack Bars

Gentle Sleep

Vita C

Fiber Plan, Unflavored


   Aug 17

Crazy awesome sweet potatoes

This recipe is going to sound ridiculous. It’s easy and amazing and totally not what you expect from a sweet potato. I learned it from a friend who had one of those “I’m hungry and my cupboard is a bit bare. Let’s see how these ingredients go together” kind of happy accident dinners.


Ingredients:

1 sweet potato

1 dollop of kefir cheese (or cream cheese if you don’t like that kefir kick, weirdo)

1 avocado

a squirt of spicy rooster sauce

a sprinkle of pine nuts


Instructions:

Bake the sweet potato in its skin. You can wrap it in foil, put it in a pan, put it on a cookie sheet, whatever makes you happy. I usually wrap it and bake for an hour at 350. You want it to be like a baked potato, nice and squishy. While you wait, toast your pine nuts.

Put your potato on the plate and slice it open along the top. Now the fun begins!

Get a good dollop of your kefir cheese and just plop it on top.

Slice your avocado and pile on all you want (then eat the rest).

Squirt on as much spicy rooster sauce you want (be careful! It’s strong!).

Sprinkle on your pine nuts.

Now you can eat it like Nathan (building each bite individually) or like me (mush it all together like a baked potato).

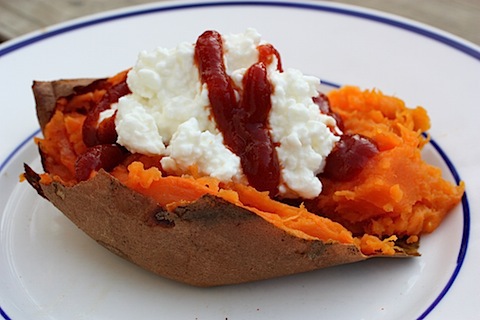
Like most of my other recipes, I just don’t have the patience to photograph it by the time I’ve finished cooking. Here are 2 pictures that have a similar look, but are totally different (and equally weird sounding). I’ll have to try them too!

Sweet potato with cottage cheese and catsup (click the image to go to that recipe).

Sweet potato with avocado and banana

Baked sweet potato with banana and avocado (again the image will take you to the recipe).


   Aug 15

My incredible shrinking mom

I hope my mom doesn’t kill me for this post, but I’m pretty darn impressed with what she’s been up to. Ever since high school when my mom was deathly ill (literally), and the doctors pumped her up with prednisone (which we later discovered she is allergic to), she has had trouble with her weight. She was always pretty tiny, and suddenly she was Violet Beauregarde. Below is a picture of my mom from my brother’s wedding last September.

She had tried several diets to no avail. She actually put ON weight on the South Beach Diet. She and some friends even hired a personal chef/nutritionist to prepare their meals for them and still the weight would not come off. In fact, she just kept expanding with no little Oompa Loompas to take her to the juicing room! Her arthritis kept her from exercising, and her weight was bad for the arthritis. She was sick and miserable and couldn’t figure out what to do.

I’m not going to give you her top weight because I want her to still like me. Let’s just say it was more than she was willing to weigh. So she looked around for a solution that was simple and effective. She doesn’t like to cook, and her job kept her very busy. So it needed to be prepared foods. She has loads of food allergies (to about 1/3 of the food allergy list which includes things like onions unless they’re well cooked and green beans) so it needed to be allergen-free. She has multiple chemical sensitivities, so it needed to be natural.

What she found worked wonders! In 3 months she lost 30 pounds without exercising! She maintained her weight through the toughest part of her year, end of school when the seniors are working to finalize graduation, the juniors are beginning their college application process, and parents have the gall to send delicious, homemade peach cobbler and homemade ice cream to the school (my mom’s biggest weakness. She admits to having a serving when such delicacies made their way to her office, yet she put on no weight).

This picture is her in July of this year. Down 30 pounds, she was back on track to continue losing. I took her to a conference where I was the photographer and left her in charge of our booth. Thanks in part to her new size (and in part to the great meal plan that’s full of protein and includes a wonderful vitamin regimen), she was able to be on her feet for 12 hours a day for 4 days straight! And she’s nearly 61!

But the best part is that since getting back on track in July, she’s lost nearly 10 more pounds despite a ridiculous amount of traveling (13 days between July 14 and August 14) and an incredibly packed schedule! The last picture I shot just yesterday. Can you believe how much slimmer her face is! That’s less than a month later! And the rest of her is significantly slimmer too! (It’s hard to get a full-length shot. She’s not a fan of those yet)

The best part is, she’s never hungry so she doesn’t have to work at it! She even had to make a deal with her boss at school to remind her to eat before the cafeteria closed so she wouldn’t accidentally work through lunch! Her biggest trouble was snacking, and she just doesn’t do that anymore because she’s full. And the secret is, this plan leaves your muscle so your metabolism doesn’t fall off. That means that you can continue to eat a reasonable amount of food after you get off the plan and not pack all that weight back on!

So I just wanted to brag on my mom for a minute. She made a commitment to lose the weight and she’s doing what it takes to do just that. All she does is drink a protein shake for breakfast (blended with fruit in her case), a regular lunch and a meal bar for dinner. If she does get hungry, there are snack bars. If she gets tired, there’s an energy tea with green tea extract. She’s fast approaching her goal and when she does, I’m going to put up two full-length shots side-by-side so you can appreciate all her hard work!

Full disclosure: I can totally vouch for the deliciousness of the bars, especially the blueberry almond meal bar and the chocolate snack bar (if you heat it, it’s like a brownie). Mom prefers the peanut butter chocolate chip meal bar and the peanut butter snack bar. I think the strawberry shake is the best while mom prefers vanilla mixed with blueberries. I prefer the green tea and it definitely works. Mom likes the pomegranate tea, which is funny because she actually dislikes tea and was slow to try it.  Of course, you could buy the whole kit and try a bunch of products at once. And if you follow these links and buy these products, I make some money which I would appreciate. Feel free to email me if you have any questions about my mom’s story or any of these products.


   Aug 12

Why eating right may not be enough

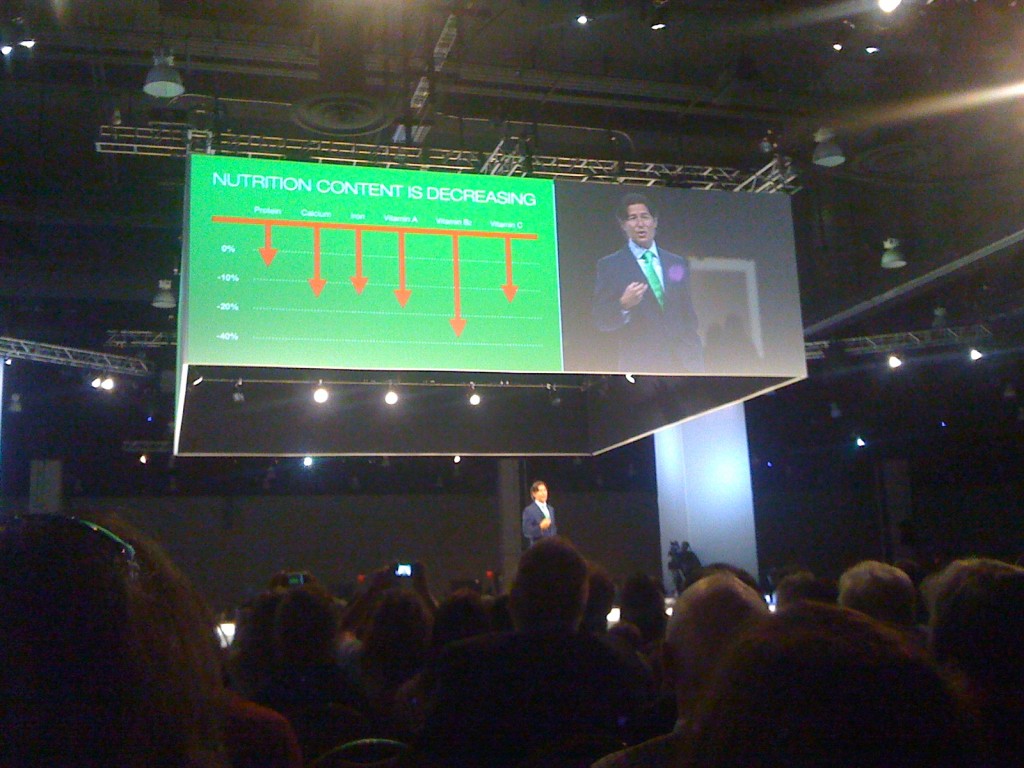
I’m in D.C. right now at a conference with my mom and boy are we learning all kinds of goodies. One thing we learned that is and isn’t surprising is the state of our food.

I know this may not be 100% legible, so here’s what it says:

Protein down 5%

Calcium down 15%

Iron down 14%

Vitamin A down close to 20%

Vitamin B2 down nearly 40%

Vitamin C down 15%

These changes are over the last 50 years! No wonder we’re a nation of starving obese people! Our food isn’t giving us enough nutrients. Because of that, our bodies are starving and say “I need to eat” but aren’t always clear on what we need. So we put in calories, hoping to satisfy that hunger.

Now, you can definitely do a lot of good by growing your own or buying from a local farmer who uses organic practices. Home grown food and locally purchased goodies are harvested at the peak of ripeness and aren’t trucked across the country or across the world. They aren’t gassed into looking ripe and coated with gunk to make them look pretty. You can control what kinds of stuff goes into the growing process and keep it organic. BUT what if, like me, you bought your home in the last several years vs owning a family farm where you know what’s been applied to the ground for generations? I know the previous owners of our house used all kinds of nasty chemicals to keep their grass greener and weed-free. Then there’s DDT which is no longer in use, but is still found in the soil thanks to its longevity. Anyway, all of this to say that our food just isn’t as satisfying as it used to be.

So to combat this (and to help keep me in my cute pants vs my big girl pants), I’ve added supplements to my daily regimen. I have to admit, I’m terrible at taking pills on a regular and consistent basis. It’s a good thing I’m not on any sort of life-saving medication! But the supplements I’ve found are so easy for me to keep track of. They come in a handy little once a day packet, and I can keep an extra strip in my purse so when I inevitably get out of the house without remembering to take them with breakfast, I’m covered. They’re rigorously tested (literally 1000 quality tests every time it’s produced!) to make sure that what is on the box AND ONLY WHAT IS ON THE BOX is what is in the pill. The pills aren’t ridiculously huge horse pills. The fish oil doesn’t taste fishy (or urp nasty or at all). In fact, it takes kind of chocolate-y to me and goes down super smooth. And the multivitamin is a reasonable size.

Pause for a brief peek down memory lane: I used to take Women’s One A Day and had to quit. The bottle clearly says “do not take on an empty stomach” and the few times I tried, I was immediately sick to my stomach and threw it all back up! These vitamins say “best if taken with a meal” but I’ve taken them well between meals (or even before I got a chance to eat thanks to my silly schedule, and I have found a new thing to help avoid that too and will elaborate soon on that topic) and it goes down just fine and stays down! No cold sweat and insta-puke!

Anyway, the whole pack comes with your day’s supply of multivitamins, a B + C complex, a fish oil and a probiotic. It’s easy (which is important for me)! It’s gluten-free (which apparently isn’t always true for vitamin pills). It’s tested safe for athletes who are subjected to random drug testing (Jessica Hardy had her Olympic dreams dashed when she tested positive for a clenbuterol thanks to a contaminated supplement from a different but well-known company). There are no artificial sweeteners or preservatives. Everything but the probiotic is even labeled Kosher! And the pills are created to release in the proper section of your digestive system to maximize their absorption so you aren’t flushing your money down the toilet (literally). If you want to read the label, here it is:

20284_label

I really think everyone should give these a try. You can get them separately, and it’s cheaper per dose if you buy the bottles and build your own daily dose, which I will probably start doing. BUT I really love having the vita-strips available for my forgetful self to keep in my purse & my suitcase, so I’ll also keep some of those around too. Of course, if you just want to try it out for 30 days, it’s way cheaper to just buy the 30-day supply of the vita-strips and make your decision after that.

If you’re interested in going ahead and getting the individual bottles, here are some direct links for that as well. I’ve linked to the smaller bottles, but know that there are bigger ones available too.

Optiflora Probiotic (or get it with a pre-botic too)

Omega Guard Fish Oil

B-Complex

Vita-Lea Multivitamin for Women


Multivitamin for Men

Multivitamin for people over 50


*And full disclosure. By following the links & buying the products, you’re supporting me and my vitamin habit. I VERY MUCH APPRECIATE IT and have to say, with the vitamins, I feel more energetic, my skin looks better, and I haven’t been dealing with this weird allergy-like scratchy throat. So thanks and please contact me if you have any questions about any of these products. If I don’t have the answer at immediate brain access, I know where to get it. :)


   Aug 08

Claire’s Awesome Baked Brussels Sprouts

2 parts Olive Oil
1 part Balsamic Vinegar
about 1/2 teaspoon of honey
a sprinkle of salt
pepper
brussels sprouts
One of those baking dishes with a lid

Mix everything but the sprouts together. I usually mix it in the baking dish.

Chop the bottoms off the sprouts and cut them in half or quarters depending on the size. Smaller is better flavor-wise. Be sure to save the outer little leaves because those are tasty, but the big tough leaves are chewy and bitter.

Put the sprouts in the mix of flavor-splosion and mix it all around. Bake it at 350 F for about an hour. You can take the lid off at some point and crisp it up. That’s how Nathan likes it. You might want to mix it around during the cooking process, just to make sure the flavor gets fully coated.

 Of course, as a photographer I should have lots of pictures of my brussels sprouts, right? Nope! By the time I’ve waited for them to cook, I can’t stand to wait any longer and into the mouth they go. Then I think, dang it, I should have photographed that. Oops! Next time.

Anyway, this picture is from another blog, but it’s a pretty good representation of what our sprouts look like when they’re done. He has a different recipe that sounds pretty darn good, so I think I’ll give it a try. I hope he isn’t mad at me for borrowing his photo. I really need to have 30 seconds of patience and photograph my own. But that’s 30 seconds that I’m not eating them!

Also, he cooks his at a higher temperature, so they’re probably crispier on the outside and less mushy in the middle. I like the mush.

Also, one other thing you might try is getting some beer cheese and mixing that in with them after they’ve cooked. Just a thought. :)


   Aug 01

Hello my lovelies!

I know there are already a few posts up, but I wanted to take some time to introduce myself. I’m Claire, a photographer and suburban gardener. My husband, Nathan, and I just moved back to Atlanta from a 5 year stint in Knoxville. While in K-town, my goal was to replace everything in our 1/4 acre yard with edibles. I’m not a lover of grass and had wanted to plant oregano and thyme in its place. We were doing a pretty good job of it, and I’ll post the schematic with comments of what we got done at some point. But work called us back to the big city, and our new goal is to go straight urban with our gardening. Here’s a video from NPR that kind of sums up my dream:

As part of my love of sustainability, I have added earth friendly albums to my wedding photography menu and am looking for other ways to get my photography even greener. Let me know if you have any suggestions! You can check out my photography http://rebeccaclaire.com